Monday, November 7, 2011

Beaded Tunisian Crochet Scarf

I decided to make a Tunisian stitch crochet scarf, but I'm all about adding extra pretty touches. This is what I came up with!

It is very easy to do, if you don't know how to Tunisian crochet there is a very simple tutorial on youtube,from Crochet Geek

Get yourself some beads, make sure they fit the yarn of your choosing. I picked some purple and black glass beads.


make sure they are large enough to move freely on the yarn. 

String them on your yarn, make sure to put on plenty as you cant add more later. I put on about 200 maybe a little more. 


I picked this black glittered worsted weight yarn (for the life of me I cant remember the brand)


This is the hook I am using. 


I add the beads as Im casting on, rather than off. So I push the bead up against the hook 


Yarn over and pull through. 

And the bead is secure! 

I'm sure you could change the way you add the beads. I've been adding my beads at random every few rows.  

Happy crocheting! 

Pin It Now!
Monday, July 11, 2011

Dye your own yarn!

I learned a new way of dying yarn. Ive been spinning for years, but have never really done a whole lot of dying. All you need for this is food  color, of your choice, vinegar, and some wool (or 100% wool yarn) You can dye one its spun or before depending on how predictable you want your colors. (It still wont be extremely predictable)
I started with this, its a mohair blend I spun and made into a hank.
You will need a trash bag (it will come in handy trust me) and a tupperware container along with the vinegar and food color. Soak the yarn (or wool) in vinegar, just until its saturated.

I dripped the color randomly over the whole thing, flipped it over and did the other side. Then roll the yarn up in the trash bag, and roll it back and forth in order to dye the whole thing.
Here it is once its unrolled.

You may want gloves....
I put it back in the tupperware, covered it, and microwaved it for about a minute or two. Then gave it a cold water rinse. Then let it dry.
The colors were very variegated, but I think its beautiful.
Then I put it into a ball to ply it with a very nice grey angora yarn I'd already spun.


There it is all finished. Now to find a project for it....

Happy spinning.

Pin It Now!

Monday, June 6, 2011

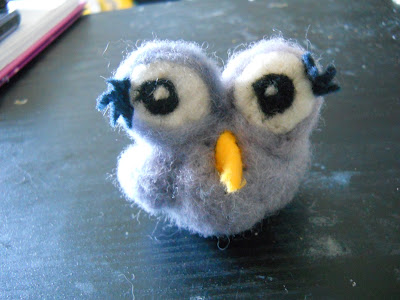
Little Felt Owl

I decided to make a little Owl like birdie, I needle felted the entire thing.

                                               Here is how you start, make a little ball.

Continue adding to the ball until you have the desired size. I always use white so I don't use too much of my dyed wool. So the white is the filler. 


Add the color of your choice (or just simply make the whole thing with that color.


Next shape the eyes, I made them pretty flat, but they don't have to be. 


Then I added eye lids, I think they looked a bit funny. 


Then add pupils, and a high light. 


Then I added eye lashes, because you doesn't love big beautiful eye lashes.


Then attach the eyes to the body. 


All thats left is the beak. 


There you go finished. 


Pin It Now!

Sunday, June 5, 2011

Shell collection

I love to find shells on the beach, and when my husband and I were in Florida I spent most of my time on the beach looking at shells. I wanted a way to display them, so I decided to get a big vase. I put all the big broken, or ugly shells towards the middle, to hold the pretty shells to the outside. Here is how it turned out.


It needs to be filled, but I figure I will go to a beach again! 


Pin It Now!

Tuesday, May 31, 2011

Take Home Beach

My husband and I went on our honey moon in Florida. We spent most of our time on the beach, so I decided to bring a piece of it home. I love finding seashells, and thats where this started.

Here is just some of the loot I found at the beach, (Siesta key, and Casperson)

When we got home I spread all my shells out on my living room floor and got to work. 
And this is how it started. 

I turned the sand dollar so that the little urchin covered the broken part. 


Once I had this I started hot gluing them down. That took forever, and I would suggest tweezers for those little shells. 

I had brought home a small container of sand, once I was done gluing all the shells, I got out the modge podge. I modge podged sections and then dusted on sand, over and over until it was completely sanded all the way around, I let a little bit get on the shells so it looked like the beach. After I was satisfied with how it turned out, I sealed the whole thing with Acrylic High Gloss sealer. 


There it is, all finished. Now all thats left to do is find the perfect beach picture to put in it. 


Pin It Now!

Monday, May 30, 2011

African Violet favors

My wedding was two weeks ago, and I want to share a few little details.

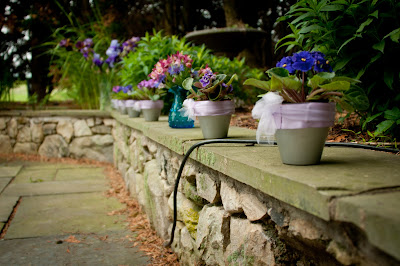
For my favors I decided to go with African Violets, that way they were the center pieces at the reception, and I got to gift them to everyone. That way I didnt let a bunch of beautiful flowers go to waste.  I started by getting the terra cotta pots I wanted, I picked 4inch pots. I wanted them to be prettier than just terra cotta. To remedy that, I started by painting them with silver craft paint, that just wasnt enough for me. So I went a step forward and wrapped the top band with purple ribbon, and then added a tulle bow. Here is how they turned out


\
Over all the day was just beautiful. All the stuff I did for myself turned out really well, and just made it a little more special. 
Pin It Now!

Saturday, April 16, 2011

More Angry Bird piggys

Have you ever played the holidays version of Angry Birds? I absolutely love it, and there is a piggy in the valentines lever with a giant bow. I thought it was cute, and I know it isnt even Valentines Day, but I couldnt help  but make it. I thought I'd share her. I needle felted her the same way Ive made the others.


Also for this one I recorded it 


Pin It Now!

Thursday, March 24, 2011

More Angry Birds

I seem to be a little addicted to felting Angry Birds, and I dont even play.... So this new one, I was excited to do because I had just gotten in from   http://www.etsy.com/people/slimchicken?ref=ls_profile some ranges of orange and yellow merino wool.  It was fun to get to use new stuff of course :)  And look at how gorgeous the wool was. 


I used the yellow in the bottom of this photo. 


Heres how it began, I used white wool to start, its a thicker tougher sheeps wool. (I cant recall what it is)
So I just built on this general shape with the needle. Then added all the details, to end with this. 


Pin It Now!