Thursday, March 24, 2011

More Angry Birds

I seem to be a little addicted to felting Angry Birds, and I dont even play.... So this new one, I was excited to do because I had just gotten in from   http://www.etsy.com/people/slimchicken?ref=ls_profile some ranges of orange and yellow merino wool.  It was fun to get to use new stuff of course :)  And look at how gorgeous the wool was. 


I used the yellow in the bottom of this photo. 


Heres how it began, I used white wool to start, its a thicker tougher sheeps wool. (I cant recall what it is)
So I just built on this general shape with the needle. Then added all the details, to end with this. 


Pin It Now!

Monday, March 21, 2011

Angry Birds Pigs

Ive been needle felting  a lot lately, and was asked to make an Angry Birds Piggy. I felted a big snow ball out of just white sheeps wool. Then added the green on top.
After I had this, I added the grey helmet, and nose.

Then eyes and the "cracks" in the helmet. 
He has black eyes, which I did in purple. 
I think he turned out  pretty good, Ive made a few more now. 


Pin It Now!

Tuesday, March 15, 2011

Bachelor Buttons

This is a painting that was very interesting for me. I under painted it with Alien Art Concepts spray paints. I only had primary colors so I started by spray yellow and blue, then over top white and using a brush to blend. It dries very fast, and is almost a tacky plastic feel. And at first putting oil paint over top was very different. It makes an interesting texture I must say, but I think it turned out great.

I started by painting in the table in sienna brown (oil paint) with liquin just to make it thin. Then the white pitcher. From there I put where the flowers would be in black acrylic paints, just so it would dry fast so I could immediately  start tapping in the blue, in oils. 


The alien paint underneath made the oils feel almost sticky, so they stood up with lots of impesto, which was the idea. I left them without stems or leaves until the end. 
I think the leaves really made the painting. I really love how the whole thing turned out. I did this painting in the studio with my teacher Lora Seiss. I really loved painting on the Alien spray paints, and I now call it the fun paint. I need to get some of my own.... 

Pin It Now!

Sunday, March 13, 2011

Flower Clutch

My wedding is in may, and I wanted a clutch. Everything I found didn't jump out at me, I just couldn't find anything I loved. So I decided, why not buy something very plain and make it what I want. I went to DSW and I picked up this
What was great is DSW sends out awesome rewards,  I had $10.00 rewards money, and $5.00 off for my birthday. Which means I only had to pay $4.00! 

My wedding colors are purple and silver, so the plain silver really is perfect. Then I added a fabric flower, that will match what I wear in my hair on my wedding day. 

I really love how it turned out, and it matches my nail-polish perfectly. (Which is Essie's Nice is Nice) 
Im so excited that this clutch is now off my things I need for the wedding. And I love how well it matches everything. 
Pin It Now!

Wednesday, March 9, 2011

Flower Hair Clip

I love hair clips, so I decided to make my own with a pretty fabric and tulle flower. So I hit Joanne's and picked up so pale purple fabric, some clips, and felt.


I drew little circles on the felt, and then cut them out for the base of the flower. 


Then I cut out two different size circles. I singed the edges a little so they dont fray. 


Then I folded it into a triangle. Then hot glued it to the felt. 


For some reason I didnt take pictures of the next two steps. But I made two larger circles, one of tulle and one of the fabric, and put it behind the felt piece. Then there is tulle over the larger petals, over that the little petals, which I did the same way as the larger petals. Then a little pearl bead in the center.  

Added the clip to the back and there you go. All done 

And here it is all finished. It was a little difficult to take a picture of the back of my head.... 


Pin It Now!

My new craft area

I haven't really had a craft area to work with, since we've moved into our apartment. I mostly had craft things scattered around the place, and then I would drag stuff out and totally clutter up our coffee table. To the point where things would fall over and mess up, and I couldn't even use the coffee table for its intended purpose. So I decided to get a table. So I went to Goodwill, and I found this little gem.


It has a ton of storage. Its about the height of a coffee table, I put it right in front of my sliding glass door so
 when I'm painting I'll have lots of natural light. I'm going to get a big pillow to sit on.


This is the right side, I love the shelf. So nice for organizing. 


Then this is the left side. I'm keeping my work in progress Breyer models here. 


With my lamp so I can work at night

Now of course I'm still compiling all my craft supplies. I never knew how much I had.... I need to quit going to the craft store. That place can be addictive. 


Pin It Now!

Saturday, March 5, 2011

Sequined Picture Frame.

I saw a frame that was sequined at a store (don't know where) a while ago, but it was more than 10 bucks. I liked it, but thought I could make my own. So thats what I did, when I was at A.C Moore, I picked up a plain white frame, and some rainbow sequins. The bag I got came with 5 different sizes.


I was going to just use tacky glue to do this, but that didn't work...At all. So  I broke out my trusty hot glue. I took the glass and back out for while I was working. 


I started in the corner, and just added random colors and sizes. I made sure they overlapped a little. It took forever, and was slow, but the end result is worth it. 


And I just kept gluing! I ended up using tweezers for the tiny ones, if you can see them poking into this picture.


Of course, Cammy just had to get in the picture some how. 


I sealed the whole thing with PLAID Clear acrylic sealer, in gloss. Just to make sure it is all going to stay there. 

Tada theres a finished sequined frame. 


Pin It Now!

Thursday, March 3, 2011

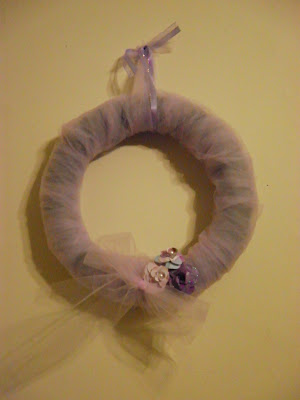
Tulle Spring wreath

Since spring is coming, and I happen to be tired of winter! I decided to make a spring themed wreath.
So I made a stop in at Joanne's, and picked up some supplies. First I got a styrofoam circle, card stock, and purple tulle.
I got 20 feet of tulle, to 2.99 and didn't even come close to using it all. The floral wire, I used to make paper roses to go on the wreath. 
I started by wrapping the tulle around, I let it over lap and fold over in places. I went around it twice. (I had left about 6" of extra when I started) when I finished, I tied it in a simple bow.
Then I added paper roses. 
And here is the finished wreath. 


Pin It Now!